Building Your First PC: Complete Guide
[!TIP] Printable Checklist Available: following along? Use our PC Building Checklist to check off steps as you go!
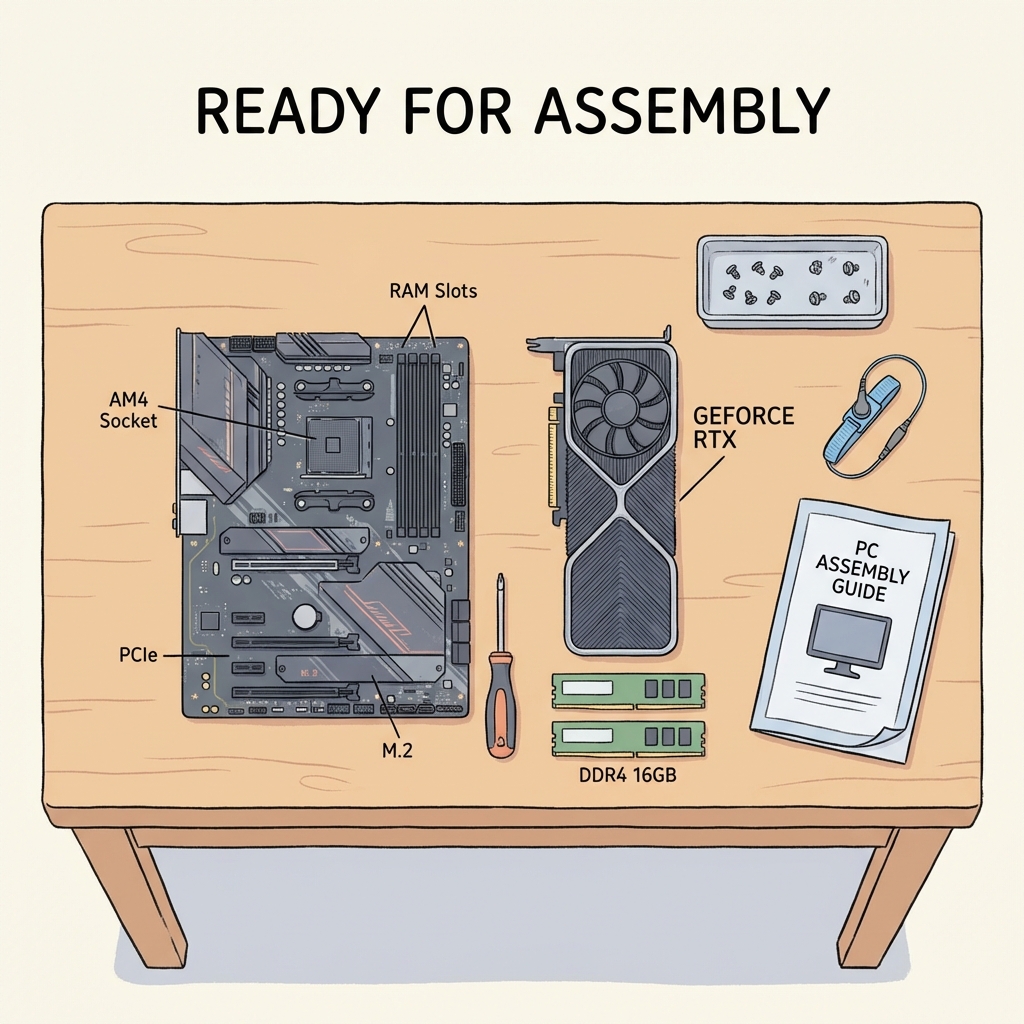
This guide walks you through the complete process of assembling your first computer. Make sure you've already chosen your components using our Understanding PC Parts Guide.
Building Your First PC: Overview
We have full step-by-step build guides elsewhere, but here's the general process:
Preparation (Before You Start)
Gather tools:
- Phillips screwdriver (magnetic tip helpful)
- Zip ties or velcro straps
- Thermal paste (usually included with cooler)
- Good lighting
- Clear workspace
Pro Tip: Watch a build video on YouTube - seeing the process helps tremendously! Also, read your motherboard manual - it's your best friend during the build.
Build Order (Simplified)
1. Install I/O shield (metal backplate) into case
- Some newer motherboards have this pre-installed. If not, snap it into the rectangular hole at the back of the case. Watch out for sharp edges!
2. Install motherboard standoffs
- These are little brass posts that keep the motherboard from touching the metal case.
- Screw them into the case holes that match your motherboard size (ATX, Micro-ATX, etc.).
3. Test fit motherboard
- Gently lower the motherboard in to make sure all holes line up with the standoffs.
4. Install CPU on motherboard (OUTSIDE the case - easier)
- Open CPU socket: Lift the metal lever arm.
- Align CPU carefully: Match the triangle layout or notches. NEVER force it! It should drop in with zero resistance.
- Close socket lever: It will require some force to lock down.
5. Install RAM (also outside case)
- Open the plastic clips on the RAM slots (usually slots 2 and 4 for two sticks - CHECK MANUAL).
- Align the notch on the RAM stick with the slot.
- Press down firmly until the clips snap shut (you'll hear a click).
6. Install M.2 SSD (if you have one)
- Remove the small screw from the M.2 slot or heat sink cover.
- Insert SSD at a 30-degree angle.
- Press down and screw it in.
7. Install CPU cooler
- Apply thermal paste (rice grain size in center) if it's not pre-applied on the cooler base.
- Mount cooler according to its specific instructions.
- Connect the fan cable to the
CPU_FANheader on the motherboard.
8. Install motherboard in case
- Lower it gently onto the standoffs you installed earlier.
- Screw it in using the correct screws. Don't overtighten! Hand-tight is fine.
9. Install power supply (PSU)
- Usually goes at the bottom rear of the case.
- Fan usually faces DOWN (through the dust filter).
- Screw it in from the outside of the case back.
10. Connect power cables
- 24-pin: The big fat one. Goes to the right side of motherbord.
- 8-pin CPU power: Goes to top left of motherboard.
- Don't connect GPU power yet.
11. Install GPU (LAST!)
- Remove the metal PCIe slot covers on the back of the case that align with the top PCIe slot.
- Align card with the slot.
- Press down firmly until the clip clicks.
- Screw the bracket to the case.
- Connect PCIe power cables from PSU to the GPU.
12. Connect case cables
- Front panel connectors: Power button, LEDs, Reset. These are tiny and fiddly. Use your motherboard manual diagram!
- USB headers: For front USB ports.
- Audio header: For front headphone jack (usually bottom left).
13. Cable management
- Route cables behind the motherboard tray.
- Zip tie bundles together.
- Keep cables away from fans.
14. Double-check everything
- All power cables connected?
- RAM fully seated?
- GPU fully inserted?
- Cooler fan connected?
First Boot
- Connect monitor to GPU (not motherboard!).
- Plug in power cable to PSU.
- Flip PSU switch to ON ("|" position).
- Press case power button.
If it works:
- Fans spin
- Lights come on
- Monitor displays BIOS screen
- Success!
If it doesn't work:
- Check PSU switch
- Check all power cables fully seated
- Reseat RAM (try one stick in slot 2)
- Check front panel power button connected correctly
Post-Boot Setup
- Enter BIOS (press Delete, F2, or F12 continuously during boot).
- Enable XMP/EXPO for RAM: This is important to get your advertised RAM speeds!
- Check all components detected (CPU, correct RAM amount, SSD).
- Save and exit BIOS.
- Install operating system from USB drive.
Common First-Time Mistakes (And How to Avoid Them)
- Forgetting I/O shield: Install it FIRST. It is super annoying to remove the entire motherboard to add it later.
- Not enabling XMP/EXPO: Your RAM runs at slow speed by default! Enable in BIOS.
- Plugging monitor into motherboard: Use GPU ports if you have a graphics card.
- Using only one RAM stick: Always use two sticks for dual-channel speed (2x8GB > 1x16GB).
- Front panel connectors wrong: Use the manual diagram. Take a photo of the manual page on your phone for easy reference.
- Forgetting motherboard standoffs: Critical! Without them, the board shorts against the case.
- CPU cooler not tightened: Needs firm, even pressure. Tighten in an X-pattern.
- Thermal paste errors: Just a pea-sized dot. Don't spread it manually.
- Static electricity: Touch case metal often. Build on a table, not carpet.
Optimization After Building
- Update all drivers: GPU drivers (NVIDIA/AMD site), Chipset drivers, Network drivers.
- Update BIOS: Optional but recommended for stability.
- Monitor temperatures: Use HWiNFO64. Idle: 30-45°C. Gaming: 60-80°C.
- Run stress tests: Prime95 (CPU) and FurMark (GPU) for 10-15 mins to ensure stability.
- Optimize Windows: Enable Game Mode, set Power Plan to Balanced/High Performance.
- Set up backups: Use an external drive or cloud storage immediately.
Troubleshooting Common Issues
PC won't turn on at all:
- PSU switch on?
- Check 24-pin and CPU power cables.
- Is the front panel power button wire connected to the right pins?
Fans spin but no display:
- Monitor plugged into GPU?
- RAM fully seated? Try just one stick.
- Clear CMOS battery.
Games run poorly:
- Monitor plugged into GPU?
- GPU drivers installed?
- Check temperatures.
Maintenance Tips
- Regular cleaning: Every 3-6 months, blow out dust with compressed air.
- Software: Update GPU drivers monthly.
- Upgrades: RAM and Storage are easiest. GPU is the most impactful upgrade for gaming.
Your Journey Continues
Congratulations! You've built a PC. You now have:
- A custom system perfectly suited to your needs
- Knowledge to maintain and upgrade your PC
- Confidence to help others
What's next?
- Set up your home lab
- Install your favorite games
- Join PC building communities like r/buildapc
Estimated time to complete: 3-5 hours for first build. Happy building!